Flour Paper Mache (2 cups flour, 2 cups water, 1 teaspoon salt):
+ Dries crunchy
+ Easier for little kids to break
+ Can be painted with acrylic paint (though I did not test that)
+ Cheaper than glue
+ Non-toxic - for kids who are old enough to help
- Can mold if you don't allow to dry completely between layers
- Gooey and messy
* Both the glue and flour versions seemed to take about 30 hours to dry "completely", but I read online that that depends a lot on whether you live in a humid place (which we do).
Glue Paper Mache (1 cup Elmers glue 1/4 C. water)
+ Sturdier than the flour paper mache (more forgiving) - has some give to it
+ Better for an older kids pinata
+ will not mold
- Needs a primer coat unless you are using spray paint or it might crackle
- More expensive
- Never was fully "hard" like the crunchy flour version
- Gooey and messy
Overall, I was surprised that the glue did not dry faster than the flour version. I think that might have been in part because I was waiting for it to get "crunchy" but it never did. I liked the flour paper mache better in the end.
Here is the process that I followed (after some trial and error)
1. Blow up balloons to the approximate sizes required. For the bat you need a large body balloon and a small head balloon. Or for things other than pinatas use a wooden or cardboard form - check out Ultimate Paper Mache for tons of cool craft ideas.
2. Gather newspapers and magazines (newspaper works best). I used about 1 issue of our local news paper per layer for each balloon.
3. Rip the newspapers into strips. Through trial and error I determined that I liked approximately 1-2" wide stripes that were about 10 inches long.
4. Martha Stewart recommends spraying the balloon with cooking spray before applying the first layer or others recommend just doing a thin layer of water only newsprint strips. That way when you pop the balloon you can pull it out fairly easily. I did not do either one, but was still able to get the balloon out (mostly).
5. If you are doing flour and water mix you can dip the strip directly in and then slide the paper through your fingers (like scissors) to remove the excess. The flour is what gives it strength and the water is what makes it pliable. For the glue method, you paint it on the balloon, like modge podge.
6. I layered it on the balloon like lines of "latitude" all the way around and then I did another layer of lines of "longitude" around the balloon. It was the only way to make sure that I spread the newsprint evenly.
7. Let each layer dry at least 24 hours. I did two thick layers on each balloon over the course of 4 days and then let dry after the second layer for 36 hours before painting.
8. Assemble the bat:
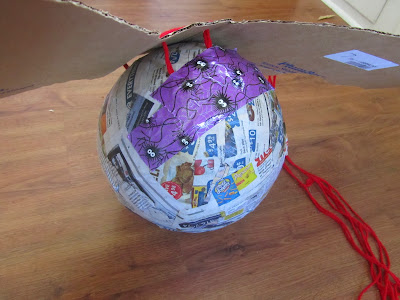
Cut out some cardboard bat wings. I think it was a good idea to make them one piece, sort of like a hang glider. I popped the balloon and cut a flap where the tail of the balloon stuck out. It was just big enough to reach my hand inside. Then I used this red acrylic yarn and threaded it on a large sharp needle. I made 4 holes in a square shape and "sewed" it on to the body leaving two long ends sticking out the top so that we could use them to attach it later.
Fill it with candy and duck tape the flap shut.
Pop the head balloon and make cuts around the end so you can open it like in the photo below.
Attach the head. Use duck tap to secure the flaps to the body. I added two strips of duck tape around the whole head for extra security.
Then cut the ears out of some lighter weight cardboard. A hershey kiss shape worked well. Fold up about 1/2 inch at the bottom and cut a small slit in the middle of the folded edge.
Crease it up a bit to make a pointy ear and secure with duck tape.
Hang it up outside and spray paint it black. Add the eyes after it dries (I forgot to do that!)
 |
| Bat Pinata - step by step |


I'm having fun catching up on all your creations. I made a flour and balloon piñata for my 13th birthday party ( my mom said I could have a party if I put it all together). I got to go first and it smashed open on the first swing....oh well.
ReplyDeleteIt is perfect time to make some plans for the future and it is time to be happy. I’ve read this post and if I could I desire to suggest you few interesting things or tips. Perhaps you could write next articles referring to this article. I want to read more things about it! entertainment news
ReplyDelete